Which ransomware prevention solution for Files is best when the list of malicious file signatures to block is greater than 300?
Third-party solution
Flow Security Central
Data Lens
File Analytics
Nutanix Files provides a built-in ransomware prevention feature that allows administrators to block malicious file signatures from being written to the file system. However, this feature has a limit of 300 signatures per share or export. If the list of malicious file signatures to block is greater than 300, a third-party solution is recommended2
Neither File Analytics nor Data Lens supports signature-based ransomware prevention with a large list of malicious file signatures (300+). Signature-based blocking requires a dedicated security solution with a robust signature database, which third-party tools are designed to handle. Nutanix Files supports integration with such tools, making a third-party solution the best choice for this requirement.
Exact Extract from Nutanix Documentation:
From the Nutanix Files Administration Guide (available on the Nutanix Portal):
“For advanced ransomware prevention requiring signature-based blocking, such as when the list of malicious file signatures exceeds 300, Nutanix Files supports integration with third-party security solutions. These solutions can handle large signature databases and perform file scanning/blocking at scale, complementing the behavioral detection capabilities of File Analytics and Data Lens.”
An administrator has been asked to confirm the ability of a physical windows Server 2019 host to boot from storage on a Nutanix AOS cluster.
Which statement is true regarding this confirmation by the administrator?
Physical servers may boot from an object bucket from the data services IP and MPIO is required.
Physical servers may boot from a volume group from the data services IP and MPIO is not required.
Physical servers may boot from a volume group from the data services IP and MPIO is
Physical servers may boot from an object bucket from the data services IP address and MPIO is not required.
Nutanix Volumes allows physical servers to boot from a volume group that is exposed as an iSCSI target from the data services IP. To ensure high availability and load balancing, multipath I/O (MPIO) is required on the physical server. Object buckets cannot be used for booting physical servers1. References: Nutanix Volumes Administration Guide1
What is the primary criteria that should be considered for performance-sensitive application shares with sequential.1/O?
IOPS
Connections
Block Size
Throughput
The primary criteria that should be considered for performance-sensitive application shares with sequential I/O is throughput. Throughput is a measure of how much data can be transferred or processed in a given time period. Throughput is usually expressed in megabytes per second (MB/s) or gigabytes per second (GB/s). Sequential I/O is a type of I/O pattern where data is read or written in a sequential order, such as streaming media, backup, or archive applications. Sequential I/O typically requires high throughput to transfer large amounts of data quickly and efficiently. References: Nutanix Files Administration Guide, page 25; Nutanix Files Solution Guide, page 10
Sequential I/O workloads are characterized by large, continuous data transfers, making throughput (data transfer rate) the primary performance criterion. For performance-sensitive application shares in Nutanix Files, ensuring high throughput (e.g., by optimizing network bandwidth, FSVM resources, or storage performance) is critical to meet the application’s requirements, such as fast streaming or efficient file transfers.
Exact Extract from Nutanix Documentation:
From the Nutanix Files Performance Guide (available on the Nutanix Portal):
“For performance-sensitive application shares with sequential I/O, the primary criterion to consider is throughput (MB/s or GB/s). Sequential I/O workloads, such as media streaming or large file transfers, prioritize the rate of data transfer. Optimize throughput by ensuring sufficient network bandwidth, FSVM resources, and storage performance.”
An administrator has performed an upgrade to Files. After upgrading, the file server cannot reach the given domain name with the specified DNS server list.
Which two steps should the administrator perform to resolve the connectivity issues with the domain controller servers? (Choose two.)
Verify the DNS settings in Prism Element.
DNS entries for the given domain name.
Verify the DNS settings in Prism Central.
DNS server addresses of the domain controllers.
The two steps that the administrator should perform to resolve the connectivity issues with the domain controller servers are:
Verify the DNS settings in Prism Element: DNS (Domain Name System) is a system that translates domain names into IP addresses. DNS settings are configurations that specify which DNS servers to use for resolving domain names. Verifying the DNS settings in Prism Element is a step that the administrator should perform, because it can help identify and correct any incorrect or outdated DNS server addresses or domain names that may cause connectivity issues with the domain controller servers.
Verify the DNS entries for the given domain name: DNS entries are records that map domain names to IP addresses or other information. Verifying the DNS entries for the given domain name is another step that the administrator should perform, because it can help check and update any incorrect or outdated IP addresses or other information that may cause connectivity issues with the domain controller servers. References: Nutanix Files Administration Guide, page 32; Nutanix Files Troubleshooting Guide
Nutanix Objects can use no more than how many vCPUs for each AHV or ESXi node?
12
16
8
10
Nutanix Objects, a component of Nutanix Unified Storage (NUS), provides an S3-compatible object storage solution. It is deployed as a set of virtual machines (Object Store Service VMs) running on the Nutanix cluster’s hypervisor (AHV or ESXi). The resource allocation for these VMs, including the maximum number of vCPUs per node, is specified in the Nutanix Objects documentation to ensure optimal performance and resource utilization.
According to the official Nutanix documentation, each Object Store Service VM is limited to a maximum of 8 vCPUs per node (AHV or ESXi). This constraint ensures that the object storage service does not overburden the cluster’s compute resources, maintaining balance with other workloads.
Option C: Correct. The maximum number of vCPUs for Nutanix Objects per node is 8.
Option A (12), Option B (16), and Option D (10): Incorrect, as they exceed or do not match the documented maximum of 8 vCPUs per node.
Exact Extract from Nutanix Documentation:
From the Nutanix Objects Administration Guide (available on the Nutanix Portal):
“Each Object Store Service VM deployed on an AHV or ESXi node is configured with a maximum of 8 vCPUs to ensure efficient resource utilization and performance. This limit applies per node hosting the Object Store Service.”
Additional Notes:
The vCPU limit is per Object Store Service VM on a given node, not for the entire Objects deployment. Multiple VMs may run across different nodes, but each is capped at 8 vCPUs.
The documentation does not specify different limits for AHV versus ESXi, so the 8 vCPU maximum applies universally.
An administrator is having difficulty enabling Data Lens for a file server. What is the most likely cause of this issue?
The file server has been cloned.
SSR is enabled on the file server.
The file server is in a Protection Domain.
The file server has blacklisted file types.
Nutanix Data Lens, a service integrated with Nutanix Unified Storage (NUS), provides data governance, analytics, and ransomware protection for Nutanix Files. Enabling Data Lens for a file server involves configuring the service to monitor the file server’s shares. If the administrator is unable to enable Data Lens, there may be a configuration or compatibility issue with the file server.
Analysis of Options:
Option A (The file server has been cloned): Correct. Cloning a file server (e.g., creating a duplicate file server instance via cloning in Nutanix) is not a supported configuration for Data Lens. Data Lens relies on a unique file server identity to manage its metadata and analytics. If the file server has been cloned, Data Lens may fail to enable due to conflicts in identity or metadata, as the cloned file server may not be properly registered or recognized by Data Lens.
Option B (SSR is enabled on the file server): Incorrect. Self-Service Restore (SSR) is a feature in Nutanix Files that allows users to recover previous versions of files in SMB shares. Enabling SSR does not affect the ability to enable Data Lens, as the two features are independent and can coexist on a file server.
Option C (The file server is in a Protection Domain): Incorrect. A Protection Domain in Nutanix is used for disaster recovery (DR) of VMs or Volume Groups, not file servers directly. Nutanix Files uses replication policies (e.g., NearSync) for DR, not Protection Domains. Even if the file server is part of a replication setup, this does not prevent Data Lens from being enabled.
Option D (The file server has blacklisted file types): Incorrect. Blacklisting file types in Nutanix Files prevents certain file extensions from being stored on shares (e.g., for security reasons). However, this feature does not affect the ability to enable Data Lens, which operates at a higher level to analyze file metadata and user activity, regardless of file types.
Why Option A?
Cloning a file server creates a duplicate instance that may not be properly registered with Data Lens, leading to conflicts in identity, metadata, or configuration. Nutanix documentation specifies that Data Lens requires a uniquely deployed file server, and cloning can cause issues when enabling the service, making this the most likely cause of the administrator’s difficulty.
Exact Extract from Nutanix Documentation:
From the Nutanix Data Lens Administration Guide (available on the Nutanix Portal):
“Data Lens requires a uniquely deployed file server to enable its services. Cloning a file server is not supported, as it may result in conflicts with Data Lens metadata and configuration. If a file server has been cloned, Data Lens may fail to enable, and the file server must be redeployed or re-registered to resolve the issue.”
An administrator needs to allow individual users to restore files and folders hosted in Files.
How can the administrator meet this requirement?
Configure a Protection Domain for the shares/exports.
Configure a Protection Domain on the FSVMs.
Enable Self-Service Restore on shares/exports.
Enable Self-Service Restore on the FSVMs.
Self-Service Restore (SSR) is a feature that allows individual users to restore files and folders hosted in Files without requiring administrator intervention. SSR can be enabled on a per-share or per-export basis, and users can access the snapshots of their data through a web portal or a Windows client application1. References: Nutanix Files Administration Guide1
Workload optimization for Files is based on which entity?
Protocol
File type
FSVM quantity
Block size
Workload optimization in Nutanix Files, part of Nutanix Unified Storage (NUS), refers to the process of tuning the Files deployment to handle specific workloads efficiently. This involves scaling resources to match the workload demands, and the primary entity for optimization is the number of File Server Virtual Machines (FSVMs).
Analysis of Options:
Option A (Protocol): Incorrect. While Nutanix Files supports multiple protocols (SMB, NFS), workload optimization is not directly based on the protocol. Protocols affect client access, but optimization focuses on resource allocation.
Option B (File type): Incorrect. File type (e.g., text, binary) is not a factor in workload optimization for Files. Optimization focuses on infrastructure resources, not the nature of the files.
Option C (FSVM quantity): Correct. Nutanix Files uses FSVMs to distribute file service workloads across the cluster. Workload optimization involves adjusting the number of FSVMs to handle the expected load, ensuring balanced performance and scalability. For example, adding more FSVMs can improve performance for high-concurrency workloads.
Option D (Block size): Incorrect. Block size is relevant for block storage (e.g., Nutanix Volumes), but Nutanix Files operates at the file level, not the block level. Workload optimization in Files does not involve block size adjustments.
Why FSVM Quantity?
FSVMs are the core entities that process file operations in Nutanix Files. Optimizing for a workload (e.g., high read/write throughput, many concurrent users) typically involves scaling the number of FSVMs to distribute the load, adding compute and memory resources as needed, or adjusting FSVM placement for better performance.
Exact Extract from Nutanix Documentation:
From the Nutanix Files Administration Guide (available on the Nutanix Portal):
“Workload optimization in Nutanix Files is achieved by adjusting the number of FSVMs in the file server. For high-performance workloads, you can scale out by adding more FSVMs to distribute the load across the cluster, ensuring optimal resource utilization and performance.”
Which action is required to allow the deletion of file server audit data in Data Lens?
Enable the File Server.
Disable the File Server.
Update the data retention period.
Configure the audit trail target.
The action that is required to allow the deletion of file server audit data in Data Lens is to update the data retention period. Data retention period is a setting that defines how long Data Lens keeps the file server audit data in its database. Data Lens collects and stores various metadata and statistics from file servers, such as file name, file type, file size, file owner, file operation, file access time, etc. Data Lens uses this data to generate reports and dashboards for file analytics and anomaly detection. The administrator can update the data retention period for each file server in Data Lens to control how long the audit data is kept before being deleted. References: Nutanix Files Administration Guide, page 98; Nutanix Data Lens User Guide
Audit data in Data Lens is managed by a retention period, after which the data is automatically deleted. To allow deletion of audit data (e.g., to free up space or comply with policies), the administrator must update the retention period to a shorter duration, triggering the deletion of data that exceeds the new period. This is the standard method for managing audit data lifecycle in Data Lens.
Exact Extract from Nutanix Documentation:
From the Nutanix Data Lens Administration Guide (available on the Nutanix Portal):
“Audit data in Data Lens is retained for a configurable retention period. To allow the deletion of file server audit data, update the data retention period in the Data Lens console or Prism Central settings. Reducing the retention period will cause older audit data to be deleted once it exceeds the new period.”
An administrator has been requested to set up a Files instance in a Nutanix environment. After testing data in the environment, it was determined an estimated 4,000 connections on average will be needed per node. What is the proper memory sizing that the administrator should use to configure this environment?
32 GiB RAM per node
40 GiB RAM per node
96 GiB RAM per node
128 GiB RAM per node
Nutanix Files, part of Nutanix Unified Storage (NUS), uses File Server Virtual Machines (FSVMs) to manage file services (e.g., SMB, NFS). Each FSVM runs on a node in the Nutanix cluster, and the number of connections per node impacts the resource requirements, particularly memory (RAM), for the FSVMs. The administrator needs to size the memory for a Files instance where each node will handle an average of 4,000 connections.
Sizing Guidelines:
Nutanix provides sizing guidelines for Files deployments based on the number of connections per FSVM (and thus per node, assuming one FSVM per node, which is the default configuration). The memory requirements scale with the number of connections to ensure performance and stability:
The minimum memory per FSVM is 12 GiB (as noted in Question 2), which supports up to 1,000 connections.
For higher connection counts, Nutanix recommends increasing the memory proportionally.
According to Nutanix documentation:
Up to 1,000 connections: 12 GiB RAM per FSVM.
1,000 to 2,000 connections: 24 GiB RAM per FSVM.
2,000 to 4,000 connections: 48 GiB RAM per FSVM.
4,000 to 8,000 connections: 96 GiB RAM per FSVM.
Since the question specifies 4,000 connections per node, and assuming one FSVM per node (standard deployment), the FSVM on each node needs to handle 4,000 connections. Based on the sizing guidelines:
4,000 connections fall into the 4,000 to 8,000 range, requiring 96 GiB RAM per FSVM.
Since each node hosts one FSVM, this translates to 96 GiB RAM per node dedicated to the FSVM.
Analysis of Options:
Option A (32 GiB RAM per node): Incorrect. 32 GiB RAM per node is sufficient for up to 2,000 connections (24 GiB for the FSVM, plus some overhead), but it is insufficient for 4,000 connections, which require 96 GiB.
Option B (40 GiB RAM per node): Incorrect. 40 GiB RAM per node is still too low for 4,000 connections, as it falls short of the 96 GiB recommended for this connection range.
Option C (96 GiB RAM per node): Correct. 96 GiB RAM per node aligns with Nutanix’s sizing guidelines for an FSVM handling 4,000 to 8,000 connections, ensuring the Files instance can manage the expected load efficiently.
Option D (128 GiB RAM per node): Incorrect. While 128 GiB RAM per node would work, it exceeds the recommended sizing for 4,000 connections. Nutanix recommends 96 GiB for up to 8,000 connections, and 128 GiB is typically reserved for even higher connection counts (e.g., >8,000) or additional workloads on the node. The question asks for the “proper” sizing, which is the minimum recommended for the given load, making 96 GiB the correct choice.
Why Option C?
For 4,000 connections per node, Nutanix recommends 96 GiB RAM per FSVM (one FSVM per node), which translates to 96 GiB RAM per node dedicated to the FSVM. This ensures the Files instance can handle the connection load without performance degradation, aligning with Nutanix’s sizing guidelines.
Exact Extract from Nutanix Documentation:
From the Nutanix Files Sizing Guide (available on the Nutanix Portal):
“For Nutanix Files deployments, memory sizing depends on the number of connections per FSVM. For 4,000 to 8,000 connections, allocate 96 GiB of RAM per FSVM. Assuming one FSVM per node, this translates to 96 GiB RAM per node dedicated to the FSVM to ensure optimal performance.”
Additional Notes:
The question assumes one FSVM per node, which is the default configuration for Nutanix Files unless otherwise specified. If multiple FSVMs were on a single node, the total RAM would need to be adjusted, but the question’s phrasing (“per node”) aligns with the standard one-FSVM-per-node deployment.
The 96 GiB RAM is for the FSVM itself; the node may require additional RAM for other workloads (e.g., CVM, VMs), but the question focuses on the Files instance’s memory sizing, making 96 GiB the correct answer.
Which two steps are required for enabling Data Lens? (Choose two.)
In Prism, enable Pulse health monitoring.
Configure a MyNutanix account to access the Data Lens console.
Configure the Data Services IP in Prism Central.
Add File Services VM admin credentials to a MyNutanix account.
Nutanix Data Lens, part of Nutanix Unified Storage (NUS), provides data governance, analytics, and ransomware protection for Nutanix Files. Enabling Data Lens involves setting up access to the Data Lens service, which is a cloud-based service hosted by Nutanix, and integrating it with the on-premises file server.
Analysis of Options:
Option A (In Prism, enable Pulse health monitoring): Incorrect. Pulse is a Nutanix feature that collects telemetry data for health monitoring and support, sending it to Nutanix Insights. While Pulse is recommended for overall cluster health, it is not a required step for enabling Data Lens. Data Lens operates independently of Pulse and focuses on file server analytics, not cluster health monitoring.
Option B (Configure a MyNutanix account to access the Data Lens console): Correct. Data Lens is a cloud-based service, and accessing its console requires a MyNutanix account. The administrator must configure the MyNutanix account credentials in Prism Central to enable Data Lens and access its features, such as the Data Lens dashboard for monitoring file server activity. This is a mandatory step to integrate with the cloud service.
Option C (Configure the Data Services IP in Prism Central): Incorrect. The Data Services IP is used for iSCSI traffic in Nutanix Volumes (as noted in Questions 25 and 31), not for Data Lens. Data Lens communicates with the Nutanix cloud (insights.nutanix.com) over the internet and does not require a Data Services IP configuration.
Option D (Add File Services VM admin credentials to a MyNutanix account): Correct. To enable Data Lens for a file server, the administrator must provide the File Services VM (FSVM) admin credentials, which are used to authenticate and integrate the file server with the Data Lens service. These credentials are added via the MyNutanix account configuration in Prism Central, allowing Data Lens to access the file server for monitoring and analytics.
Selected Steps:
B: Configuring a MyNutanix account is required to access the Data Lens console and enable the service.
D: Adding FSVM admin credentials to the MyNutanix account ensures that Data Lens can authenticate and monitor the file server.
Exact Extract from Nutanix Documentation:From the Nutanix Data Lens Administration Guide (available on the Nutanix Portal):
“To enable Data Lens, configure a MyNutanix account in Prism Central to access the Data Lens console. Additionally, add the File Services VM admin credentials to the MyNutanix account to allow Data Lens to authenticate with the file server and enable monitoring and analytics features.”
Within the Prism Central Entity > Services > Objects menu option, what is the correct task order for creating an object storage?
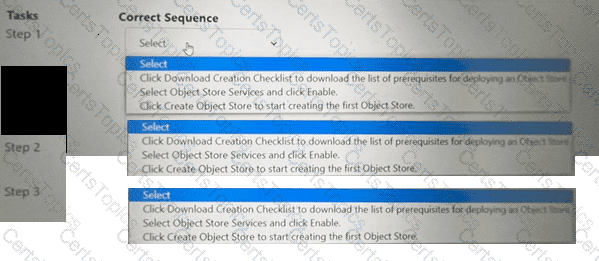

The correct task order for creating an object store is:
Select ObjectStore Service and click Enable
Click Create Object Store to start creating the first Object store
Click Download Creation Checklist to download the list of prerequisites for deploying an Object store
The first step is to enable the ObjectStore Service, which is a service that allows users to create and manage object storage clusters on a Nutanix cluster. The second step is to create an Object store, which is an object storage cluster that provides S3-compatible access to buckets and objects for various applications and users. The third step is to download the Creation Checklist, which is a document that lists the prerequisites and configurations that are required for deploying an Object store, such as cluster details, network details, storage details, etc. The administrator should review and complete the Creation Checklist before proceeding with the deployment of the Object store.
Users are complaining about having to reconnecting to share when there are networking issues.
Which files feature should the administrator enable to ensure the sessions will auto-reconnect in such events?
Durable File Handles
Multi-Protocol Shares
Connected Shares
Workload Optimization
The Files feature that the administrator should enable to ensure the sessions will auto-reconnect in such events is Durable File Handles. Durable File Handles is a feature that allows SMB clients to reconnect to a file server after a temporary network disruption or a client sleep state without losing the handle to the open file. Durable File Handles can improve the user experience and reduce the risk of data loss or corruption. Durable File Handles can be enabled for each share in the Files Console. References: Nutanix Files Administration Guide, page 76; Nutanix Files Solution Guide, page 10
An administrator is required to place all iSCSI traffic on an isolated network. How can the administrator meet this requirement?
Create a new network interface on the CVMs via ncli.
Configure the Data Services IP on an isolated network.
Configure network segmentation for Volumes.
Create a Volumes network in Prism Central.
Nutanix Volumes, part of Nutanix Unified Storage (NUS), provides block storage services via iSCSI to external hosts, such as physical servers. The iSCSI traffic is managed by the Controller VMs (CVMs) in the Nutanix cluster, and a virtual IP address called the Data Services IP is used for iSCSI communication. To isolate iSCSI traffic on a dedicated network, the administrator must ensure that this traffic is routed over the isolated network.
Analysis of Options:
Option A (Create a new network interface on the CVMs via ncli): Incorrect. While it’s possible to create additional network interfaces on CVMs using the ncli command-line tool, this is not the recommended or standard method for isolating iSCSI traffic. The Data Services IP is the primary mechanism for managing iSCSI traffic, and it can be assigned to an isolated network without creating new interfaces on each CVM.
Option B (Configure the Data Services IP on an isolated network): Correct. The Data Services IP (also known as the iSCSI Data Services IP) is a cluster-wide virtual IP used for iSCSI traffic. By configuring the Data Services IP to use an IP address on the isolated network (e.g., a specific VLAN or subnet dedicated to iSCSI), the administrator ensures that all iSCSI traffic is routed over that network, meeting the requirement for isolation. This configuration is done in Prism Element under the cluster’s iSCSI settings.
Option C (Configure network segmentation for Volumes): Incorrect. Network segmentation in Nutanix typically refers to isolating traffic using VLANs or separate subnets, which is indirectly achieved by configuring the Data Services IP (option B). However, “network segmentation for Volumes” is not a specific feature or configuration step in Nutanix; the correct approach is to assign the Data Services IP to the isolated network, which inherently segments the traffic.
Option D (Create a Volumes network in Prism Central): Incorrect. Prism Central is used for centralized management of multiple clusters, but the configuration of iSCSI traffic (e.g., the Data Services IP) is performed at the cluster level in Prism Element, not Prism Central. There is no concept of a “Volumes network” in Prism Central for this purpose.
Why Option B?
The Data Services IP is the key configuration for iSCSI traffic in a Nutanix cluster. By assigning this IP to an isolated network (e.g., a dedicated VLAN or subnet), the administrator ensures that all iSCSI traffic is routed over that network, achieving the required isolation. This is a standard and recommended approach in Nutanix for isolating iSCSI traffic.
Exact Extract from Nutanix Documentation:
From the Nutanix Volumes Administration Guide (available on the Nutanix Portal):
“To isolate iSCSI traffic on a dedicated network, configure the Data Services IP with an IP address on the isolated network. This ensures that all iSCSI traffic between external hosts and the Nutanix cluster is routed over the specified network, providing network isolation as required.”
An administrator has connected 100 users to multiple Files shares to perform read and write activity. The administrator needs to view audit trails in File Analytics of these 100 users. From which two Audit Trail options can the administrator choose to satisfy this task? (Choose two.)
Share Name
Client IP
Directory
Folders
Nutanix File Analytics, part of Nutanix Unified Storage (NUS), provides audit trails to track user activities within Nutanix Files shares. Audit trails include details such as who accessed a file, from where, and what actions were performed. The administrator needs to view the audit trails for 100 users, which requires filtering or grouping the audit data by relevant criteria.
Analysis of Options:
Option A (Share Name): Correct. Audit trails in File Analytics can be filtered by Share Name, allowing the administrator to view activities specific to a particular share. Since the 100 users are connected to multiple shares, filtering by Share Name helps narrow down the audit trails to the shares being accessed by these users, making it easier to analyze their activities.
Option B (Client IP): Correct. File Analytics audit trails include the Client IP address from which a user accesses a share (as noted in Question 14). Filtering by Client IP allows the administrator to track the activities of users based on their IP addresses, which can be useful if the 100 users are accessing shares from known IPs, helping to identify their read/write activities.
Option C (Directory): Incorrect. While audit trails track file and directory-level operations, “Directory” is not a standard filter option in File Analytics audit trails. The audit trails can show activities within directories, but the primary filtering options are more granular (e.g., by file) or higher-level (e.g., by share).
Option D (Folders): Incorrect. Similar to “Directory,” “Folders” is not a standard filter option in File Analytics audit trails. While folder-level activities are logged, the audit trails are typically filtered by Share Name, Client IP, or specific files, not by a generic “Folders” category.
Selected Options:
A: Filtering by Share Name allows the administrator to focus on the specific shares accessed by the 100 users.
B: Filtering by Client IP enables tracking user activities based on their IP addresses, which is useful for identifying the 100 users’ actions across multiple shares.
Exact Extract from Nutanix Documentation:
From the Nutanix File Analytics Administration Guide (available on the Nutanix Portal):
“File Analytics Audit Trails allow administrators to filter user activities by various criteria, including Share Name and Client IP. Filtering by Share Name enables viewing activities on a specific share, while filtering by Client IP helps track user actions based on their source IP address.”
Which two audit trails can be monitored within Data Lens? (Choose two.)
User Emails
Client IPs
Files
Anomalies
Nutanix Data Lens, a service integrated with Nutanix Unified Storage (NUS), provides data governance and security features for Nutanix Files. One of its key features is Audit Trails, which tracks user activities and file operations. The audit trails include specific details that can be monitored and reported.
Analysis of Options:
Option A (User Emails): Incorrect. Data Lens Audit Trails track user activities, but they do not specifically log user emails as an audit trail metric. User identities (e.g., usernames) are logged, but email addresses are not a standard audit trail field.
Option B (Client IPs): Correct. Data Lens Audit Trails include the client IP addresses from which file operations are performed, allowing administrators to track the source of user actions (e.g., which IP accessed or modified a file).
Option C (Files): Correct. Data Lens Audit Trails track file-level operations, such as access, modifications, deletions, and permission changes, making “Files” a key audit trail metric.
Option D (Anomalies): Incorrect. While Data Lens does detect anomalies (e.g., ransomware activity, unusual file operations), anomalies are a separate feature, not an audit trail. Audit Trails focus on logging specific user and file activities, while anomalies are derived from analyzing those activities.
Selected Audit Trails:
B: Client IPs are logged in audit trails to identify the source of file operations.
C: Files are the primary entities tracked in audit trails, with details on operations performed on them.
Exact Extract from Nutanix Documentation:
From the Nutanix Data Lens Administration Guide (available on the Nutanix Portal):
“Data Lens Audit Trails provide detailed logging of file operations, including the files affected, the user performing the action, and the client IP address from which the operation was initiated. This allows administrators to monitor user activities and track access patterns.”
An administrator needs to enable a Nutanix feature that will ensure automatic client reconnection to shares whenever there are intermittent server-side networking issues and FSVM HA events. Which Files feature should the administrator enable?
Multi-Protocol Shares
Connected Shares
Durable File Handles
Persistent File Handles
Nutanix Files, part of Nutanix Unified Storage (NUS), provides file shares (e.g., SMB, NFS) that clients access. Intermittent server-side networking issues or FSVM High Availability (HA) events (e.g., an FSVM failover, as discussed in Question 40) can disrupt client connections. The administrator needs a feature to ensure automatic reconnection to shares during such events, minimizing disruption for users.
Analysis of Options:
Option A (Multi-Protocol Shares): Incorrect. Multi-Protocol Shares allow a share to be accessed via both SMB and NFS (as in Questions 8 and 60), but this feature does not address client reconnection during networking issues or FSVM HA events—it focuses on protocol support, not connection resilience.
Option B (Connected Shares): Incorrect. “Connected Shares” is not a recognized feature in Nutanix Files. It appears to be a made-up term and does not apply to automatic client reconnection.
Option C (Durable File Handles): Correct. Durable File Handles is an SMB feature in Nutanix Files (as noted in Question 19) that ensures automatic client reconnection after temporary server-side disruptions, such as networking issues or FSVM HA events (e.g., failover when an FSVM’s IP is reassigned, as in Question 40). When enabled, Durable File Handles allow SMB clients to maintain their session state and automatically reconnect without user intervention, meeting the requirement.
Option D (Persistent File Handles): Incorrect. “Persistent File Handles” is not a standard feature in Nutanix Files. It may be confused with Durable File Handles (option C), which is the correct term for this SMB capability. Persistent File Handles is not a recognized Nutanix feature.
Why Option C?
Durable File Handles is an SMB 2.1+ feature supported by Nutanix Files that ensures clients can automatically reconnect to shares after server-side disruptions, such as intermittent networking issues or FSVM HA events (e.g., failover). This feature maintains the client’s session state, allowing seamless reconnection without manual intervention, directly addressing the administrator’s requirement.
Exact Extract from Nutanix Documentation:
From the Nutanix Files Administration Guide (available on the Nutanix Portal):
“Durable File Handles is an SMB feature in Nutanix Files that ensures automatic client reconnection to shares during server-side disruptions, such as intermittent networking issues or FSVM HA events. Enable Durable File Handles to maintain client session state and allow seamless reconnection without user intervention.”
Refer to the exhibit.
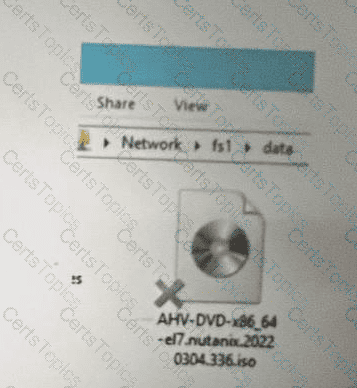
What does the ‘’X’’ represent on the icon?
Share Disconnected File
Corrupt ISO
Distributed shared file
Tiered File
The “X” on the icon represents a distributed shared file, which is a file that belongs to a distributed share or export. A distributed share or export is a type of SMB share or NFS export that distributes the hosting of top-level directories across multiple FSVMs. The “X” indicates that the file is not hosted by the current FSVM, but by another FSVM in the cluster. The “X” also helps to identify which files are eligible for migration when using the Nutanix Files Migration Tool. References: Nutanix Files Administration Guide, page 34; Nutanix Files Migration Tool User Guide, page 10
A company's Marketing department requires the ability to recover files hosted in a Files share. They also require the ability to restore files within a timeframe of 14 days. Which two configurations are required to meet these requirements? (Choose two.)
Change default settings in the Protection Configuration window.
Change the Protection Domain settings to keep at least 14 days of snapshots.
Install Nutanix Guest Tools on clients who need to perform Self-Service Restore.
Enable Self-Service Restore at the share level.
The Marketing department needs to recover files in a Nutanix Files share with a recovery window of 14 days. Nutanix Files, part of Nutanix Unified Storage (NUS), supports file recovery through Self-Service Restore (SSR) for SMB shares, which relies on snapshots to provide previous versions of files.
Analysis of Options:
Option A (Change default settings in the Protection Configuration window): Incorrect. The “Protection Configuration window” is not a specific feature in Nutanix Files. This may be a vague reference to snapshot policies, but the correct terminology is Protection Domain or snapshot schedules, as in option B.
Option B (Change the Protection Domain settings to keep at least 14 days of snapshots): Correct. Nutanix Files uses snapshots to enable file recovery via SSR. These snapshots are managed through Protection Domains (or snapshot schedules in newer terminology) in Prism Element or Prism Central. To ensure files can be restored within a 14-day timeframe, the snapshot retention policy must be configured to retain snapshots for at least 14 days.
Option C (Install Nutanix Guest Tools on clients who need to perform Self-Service Restore): Incorrect. Nutanix Guest Tools (NGT) is used for VM management features (e.g., VSS snapshots for backups, VM mobility), but it is not required for Self-Service Restore in Nutanix Files. SSR is a client-side feature for SMB shares that works natively with Windows clients (via the Previous Versions tab) and does not require NGT.
Option D (Enable Self-Service Restore at the share level): Correct. Self-Service Restore (SSR) must be enabled at the share level in Nutanix Files to allow users to recover files without administrator intervention. This feature enables the Marketing department to restore files directly from their Windows clients using the Previous Versions feature, provided snapshots are available (as configured in option B).
Selected Configurations:
B: Configuring the snapshot retention to at least 14 days ensures that previous versions of files are available for recovery within the required timeframe.
D: Enabling SSR at the share level allows the Marketing department to perform the recovery themselves, meeting the requirement for user-driven file recovery.
Exact Extract from Nutanix Documentation:
From the Nutanix Files Administration Guide (available on the Nutanix Portal):
“Self-Service Restore (SSR) allows users to recover previous versions of files in SMB shares. To enable SSR, it must be activated at the share level in the Files Console. SSR relies on snapshots to provide previous versions; ensure that snapshot schedules (via Protection Domains or snapshot policies) are configured to retain snapshots for the desired recovery period, such as 14 days.”
Deploying Files instances require which two minimum resources? (Choose two)
12 GiB of memory per host
8 vCPUs per host
8 GiB of memory per host
4 vCPUs per host
The two minimum resources that are required for deploying Files instances are 8 GiB of memory per host and 4 vCPUs per host. Memory and vCPUs are resources that are allocated to VMs (Virtual Machines) to run applications and processes. Files instances are file server instances (FSIs) that run on FSVMs (File Server VMs) on a Nutanix cluster. FSVMs require at least 8 GiB of memory and 4 vCPUs per host to function properly and provide SMB and NFS access to file shares and exports. The administrator should ensure that there are enough memory and vCPUs available on each host before deploying Files instances. References: Nutanix Files Administration Guide, page 27; Nutanix Files Solution Guide, page 6
An administrator created a bucket for an upcoming project where internal users as well as an outside consultant …. Object Browser. The administrator needs to provide both internal and consultant access to the same bucket.
The organization would like to prevent internal access to the consultant, based on their security policy.
Which two items are requires to fulfill this requirement (Choose two.)
Configure Directory Services under the Access Keys section
Generate access keys based on directory and email-based users.
Install third-party software for bucket access to all users.
Generate access keys using third-party software.
Nutanix Objects supports directory services integration, which allows administrators to configure access keys based on directory and email-based users. This enables granular access control and security for buckets and objects. The administrator can configure directory services under the Access Keys section in Prism Central, and then generate access keys for internal users from the directory service and for the consultant from an email address2. References: Nutanix Objects Administration Guide2
An administrator has received reports of resource issues on a file server. The administrator needs to review the following graphs, as displayed in the exhibit:
Storage Used
Open Connections
Number of Files
Top Shares by Current Capacity
Top Shares by Current ConnectionsWhere should the administrator complete this action?
Files Console Shares View
Files Console Monitoring View
Files Console Data Management View
Files Console Dashboard View
Nutanix Files, part of Nutanix Unified Storage (NUS), provides a management interface called the Files Console, accessible via Prism Central. The administrator needs to review graphs related to resource usage on a file server, including Storage Used, Open Connections, Number of Files, Top Shares by Current Capacity, and Top Shares by Current Connections. These graphs provide insights into the file server’s performance and resource utilization, helping diagnose reported resource issues.
Analysis of Options:
Option A (Files Console Shares View): Incorrect. The Shares View in the Files Console displays details about individual shares (e.g., capacity, permissions, quotas), but it does not provide high-level graphs like Storage Used, Open Connections, or Top Shares by Current Capacity/Connections. It focuses on share-specific settings, not overall file server metrics.
Option B (Files Console Monitoring View): Incorrect. While “Monitoring View” sounds plausible, there is no specific “Monitoring View” tab in the Files Console. Monitoring-related data (e.g., graphs, metrics) is typically presented in the Dashboard View, not a separate Monitoring View.
Option C (Files Console Data Management View): Incorrect. There is no “Data Management View” in the Files Console. Data management tasks (e.g., Smart Tiering, as in Question 58) are handled in other sections, but graphs like Storage Used and Top Shares are not part of a dedicated Data Management View.
Option D (Files Console Dashboard View): Correct. The Dashboard View in the Files Console provides an overview of the file server’s performance and resource usage through various graphs and metrics. It includes graphs such as Storage Used (total storage consumption), Open Connections (active client connections), Number of Files (total files across shares), Top Shares by Current Capacity (shares consuming the most storage), and Top Shares by Current Connections (shares with the most active connections). This view is designed to help administrators monitor and troubleshoot resource issues, making it the correct location for reviewing these graphs.
Why Option D?
The Files Console Dashboard View is the central location for monitoring file server metrics through graphs like Storage Used, Open Connections, Number of Files, and Top Shares by Capacity/Connections. These graphs provide a high-level overview of resource utilization, allowing the administrator to diagnose reported resource issues effectively.
Exact Extract from Nutanix Documentation:
From the Nutanix Files Administration Guide (available on the Nutanix Portal):
“The Files Console Dashboard View provides an overview of file server performance and resource usage through graphs, including Storage Used, Open Connections, Number of Files, Top Shares by Current Capacity, and Top Shares by Current Connections. Use the Dashboard View to monitor and troubleshoot resource issues on the file server.”
An administrator needs to generate a File Analytics report which lists the top owners with space consumed. Which two formats are available to the administrator for this task? (Choose two.)
XML
CSV
JSON
Nutanix File Analytics, part of Nutanix Unified Storage (NUS), provides reporting capabilities for monitoring file server activity, including space usage by owners. The administrator wants to generate a report listing the top owners by space consumed, which is a standard report in File Analytics. The available export formats for such reports determine how the data can be shared or analyzed.
Analysis of Options:
Option A (XML): Incorrect. File Analytics does not support exporting reports in XML format. While XML is a common data format, Nutanix File Analytics focuses on more user-friendly formats like PDF and CSV for report exports.
Option B (PDF): Correct. File Analytics allows reports, such as the top owners by space consumed, to be exported in PDF format. This format is useful for creating a formatted, printable report that can be shared with stakeholders or archived for documentation purposes.
Option C (CSV): Correct. File Analytics also supports exporting reports in CSV (Comma-Separated Values) format. This format is ideal for further analysis, as the data can be imported into tools like Excel or other data processing software to manipulate the list of top owners and their space consumption.
Option D (JSON): Incorrect. JSON is a data format often used for APIs or data interchange, but File Analytics does not support exporting reports in JSON format. The focus is on PDF for presentation and CSV for data analysis.
Selected Formats:
B: PDF format provides a formatted report suitable for sharing or printing.
C: CSV format allows for data export and further analysis in external tools.
Exact Extract from Nutanix Documentation:
From the Nutanix File Analytics Administration Guide (available on the Nutanix Portal):
“File Analytics reports, such as top owners by space consumed, can be exported in PDF format for presentation or CSV format for further analysis. These formats allow administrators to share reports with stakeholders or import the data into other tools for additional processing.”
A Files administrator needs to generate a report listing the files matching those in the exhibit.
What is the most efficient way to complete this task?
Use Report Builder in File Analytics.
Create a custom report in Prism Central.
Use Report Builder in Files Console.
Create a custom report in Files Console.
The most efficient way to generate a report listing the files matching those in the exhibit is to use Report Builder in File Analytics. Report Builder is a feature that allows administrators to create custom reports based on various filters and criteria, such as file name, file type, file size, file owner, file age, file access time, file modification time, file permission change time, and so on. Report Builder can also export the reports in CSV format for further analysis or sharing. References: Nutanix Files Administration Guide, page 97; Nutanix File Analytics User Guide
What is the binary image extension of File Analytics?
JSON
QCOW2
ISO
VMDK
File Analytics is deployed as a VM, and Nutanix provides its binary image in QCOW2 format for AHV, which is the primary hypervisor for Nutanix clusters. QCOW2 is the standard disk image format for AHV, making it the correct choice for the File Analytics deployment image.
Exact Extract from Nutanix Documentation:
From the Nutanix File Analytics Deployment Guide (available on the Nutanix Portal):
“The File Analytics VM is provided as a binary image in QCOW2 format for deployment on AHV clusters. To deploy File Analytics, download the QCOW2 image from the Nutanix Portal and import it into the cluster using Prism Central or Prism Element.”
An administrator has been tasked with updating the cool-off interval of an existing WORM share from the default value to five minutes. How should the administrator complete this task?
Delete and re-create the WORM share.
Update the worm_cooloff_interval parameter using CLI.
Contact support to update the WORM share.
Use FSM to update the worm_cooloff_interval parameter.
Nutanix Files, part of Nutanix Unified Storage (NUS), supports WORM (Write Once, Read Many) shares to enforce immutability for compliance and data retention. A WORM share prevents files from being modified or deleted for a specified retention period. The “cool-off interval” (or cool-off period) is the time after a file is written to a WORM share during which it can still be modified or deleted before becoming immutable. The default cool-off interval is typically 1 minute, and the administrator wants to update it to 5 minutes.
Analysis of Options:
Option A (Delete and re-create the WORM share): Incorrect. Deleting and re-creating the WORM share would remove the existing share and its data, which is disruptive and unnecessary. The cool-off interval can be updated without deleting the share, making this an inefficient and incorrect approach.
Option B (Update the worm_cooloff_interval parameter using CLI): Correct. The worm_cooloff_interval parameter controls the cool-off period for WORM shares in Nutanix Files. This parameter can be updated using the Nutanix CLI (e.g., ncli or afs commands) on the file server. The administrator can log into an FSVM, use the CLI to set the worm_cooloff_interval to 5 minutes (300 seconds), and apply the change without disrupting the share. This is the most direct and efficient method to update the cool-off interval.
Option C (Contact support to update the WORM share): Incorrect. Contacting Nutanix support is unnecessary for this task, as updating the cool-off interval is a standard administrative action that can be performed using the CLI. Support is typically needed for complex issues, not for configurable parameters like this.
Option D (Use FSM to update the worm_cooloff_interval parameter): Incorrect. FSM (File Server Manager) is not a standard Nutanix tool or interface for managing Files configurations. The correct method is to use the CLI (option B) to update the worm_cooloff_interval parameter. While the Files Console (FSM-like interface) can manage some share settings, the cool-off interval requires CLI access.
Why Option B?
The worm_cooloff_interval parameter is a configurable setting in Nutanix Files that controls the cool-off period for WORM shares. Updating this parameter via the CLI (e.g., using ncli or afs commands on an FSVM) allows the administrator to change the cool-off interval from the default (1 minute) to 5 minutes without disrupting the existing share. This is the recommended and most efficient method per Nutanix documentation.
Exact Extract from Nutanix Documentation:
From the Nutanix Files Administration Guide (available on the Nutanix Portal):
“The cool-off interval for a WORM share, which determines the time after a file is written during which it can still be modified, is controlled by the worm_cooloff_interval parameter. To update this interval, use the CLI on an FSVM to set the parameter (e.g., to 300 seconds for 5 minutes) using commands like ncli or afs, then apply the change.”
How many configure snapshots are supported for SSR in a file server?
25
50
100
200
The number of configurable snapshots that are supported for SSR in a file server is 200. SSR (Snapshot-based Replication) is a feature that allows administrators to replicate snapshots of shares or exports from one file server to another file server on a different cluster or site for disaster recovery purposes. SSR can be configured with various parameters, such as replication frequency, replication status, replication mode, etc. SSR supports up to 200 configurable snapshots per share or export in a file server. References: Nutanix Files Administration Guide, page 81; Nutanix Files Solution Guide, page 9
Which two statements are true about HA for a file server? (Choose two.)
Files reassigns the IP address of the FSVM to another FSVM.
Shares availability are not impacted for several minutes.
Multiple FSVMs can share a single host.
Affinity rules affect HA.
Nutanix Files, part of Nutanix Unified Storage (NUS), uses File Server Virtual Machines (FSVMs) to manage file services. High Availability (HA) in Nutanix Files ensures that shares remain accessible even if an FSVM or host fails. HA mechanisms include IP reassignment, FSVM distribution, and integration with hypervisor HA features.
Analysis of Options:
Option A (Files reassigns the IP address of the FSVM to another FSVM): Correct. In a Nutanix Files HA scenario, if an FSVM fails (e.g., due to a host failure), the IP address of the failed FSVM is reassigned to another FSVM in the file server. This ensures that clients can continue accessing shares without disruption, as the share’s endpoint (IP address) remains the same, even though the backend FSVM handling the request has changed.
Option B (Shares availability are not impacted for several minutes): Incorrect. While Nutanix Files HA minimizes downtime, there is typically a brief disruption (seconds to a minute) during an FSVM failure as the IP address is reassigned and the new FSVM takes over. The statement “not impacted for several minutes” implies a longer acceptable downtime, which is not accurate—HA aims to restore availability quickly, typically within a minute.
Option C (Multiple FSVMs can share a single host): Incorrect. Nutanix Files HA requires that FSVMs are distributed across different hosts to ensure fault tolerance. By default, one FSVM runs per host, and Nutanix uses anti-affinity rules to prevent multiple FSVMs from residing on the same host. This ensures that a single host failure does not impact multiple FSVMs, which would defeat the purpose of HA.
Option D (Affinity rules affect HA): Correct. Nutanix Files leverages hypervisor HA features (e.g., AHV HA) and uses affinity/anti-affinity rules to manage FSVM placement. Anti-affinity rules ensure that FSVMs are placed on different hosts, which is critical for HA—if multiple FSVMs were on the same host, a host failure would impact multiple FSVMs, reducing availability. These rules directly affect how HA functions in a Files deployment.
Selected Statements:
A: IP reassignment is a core HA mechanism in Nutanix Files to maintain share accessibility during FSVM failures.
D: Affinity (specifically anti-affinity) rules ensure FSVM distribution across hosts, which is essential for effective HA.
Exact Extract from Nutanix Documentation:
From the Nutanix Files Administration Guide (available on the Nutanix Portal):
“High Availability (HA) in Nutanix Files ensures continuous share access during failures. If an FSVM fails, its IP address is reassigned to another FSVM in the file server to maintain client connectivity. Nutanix Files uses anti-affinity rules to distribute FSVMs across different hosts, ensuring that a single host failure does not impact multiple FSVMs, which is critical for HA.”
An administrator sees that the Cluster drop-down or the Subnets drop-down shows empty lists or an error message when no Prism Element clusters or subnets are available for deployment, respectively. Additionally, the administrator sees that no Prism Element clusters are listed during the addition of multi-cluster to the Object Store. What would cause the Prism Element clusters or subnets to not appear in the user interface?
The logged-in user does not have access to any Prism Central.
The logged-in user does not have access to any subnets on the allowed Prism Central.
The administrator has just created an access policy granting user access to Prism Element.
The administrator has just created an access policy denying user access to a subnet in Prism Element.
Nutanix Objects, part of Nutanix Unified Storage (NUS), is deployed and managed through Prism Central (PC), which provides a centralized interface for managing multiple Prism Element (PE) clusters. When deploying Objects or adding multi-cluster support to an Object Store, the administrator selects a PE cluster and associated subnets from drop-down lists in the Prism Central UI. If these drop-down lists are empty or show an error, it indicates an issue with visibility or access to the clusters or subnets.
Analysis of Options:
Option A (The logged-in user does not have access to any Prism Central): Correct. Prism Central is required to manage Nutanix Objects deployments and multi-cluster configurations. If the logged-in user does not have access to any Prism Central instance (e.g., due to RBAC restrictions or no PC being deployed), they cannot see any PE clusters or subnets in the UI, as Prism Central is the interface that aggregates this information. This would result in empty drop-down lists for clusters and subnets, as well as during multi-cluster addition for the Object Store.
Option B (The logged-in user does not have access to any subnets on the allowed Prism Central): Incorrect. While subnet access restrictions could prevent subnets from appearing in the Subnets drop-down, this does not explain why the Cluster drop-down is empty or why no clusters are listed during multi-cluster addition. The issue is broader—likely related to Prism Central access itself—rather than subnet-specific permissions.
Option C (The administrator has just created an access policy granting user access to Prism Element): Incorrect. Granting access to Prism Element directly does not affect visibility in Prism Central’s UI. Objects deployment and multi-cluster management are performed through Prism Central, not Prism Element. Even if the user has PE access, they need PC access to see clusters and subnets in the Objects deployment workflow.
Option D (The administrator has just created an access policy denying user access to a subnet in Prism Element): Incorrect. Denying access to a subnet in Prism Element might affect subnet visibility in the Subnets drop-down, but it does not explain the empty Cluster drop-down or the inability to see clusters during multi-cluster addition. Subnet access policies are secondary to the broader issue of Prism Central access.
Why Option A?
The core issue is that Prism Central is required to display PE clusters and subnets in the UI for Objects deployment and multi-cluster management. If the logged-in user does not have access to any Prism Central instance (e.g., they are not assigned the necessary role, such as Prism Central Admin, or no PC is registered), the UI cannot display any clusters or subnets, resulting in empty drop-down lists. This also explains why no clusters are listed during multi-cluster addition for the Object Store, as Prism Central is the central management point for such operations.
Exact Extract from Nutanix Documentation:
From the Nutanix Objects Deployment Guide (available on the Nutanix Portal):
“Nutanix Objects deployment and multi-cluster management are performed through Prism Central. The logged-in user must have access to Prism Central with appropriate permissions (e.g., Prism Central Admin role) to view Prism Element clusters and subnets in the deployment UI. If the user does not have access to Prism Central, the Cluster and Subnets drop-down lists will be empty, and multi-cluster addition will fail to list available clusters.”
An administrator is tasked with deploying a Microsoft Server Failover Cluster for a critical application that uses shared storage.
The failover cluster instance will consist of VMs running on an AHV-hosted cluster and bare metal servers for maximum resiliency.
What should the administrator do to satisfy this requirement?
Create a Bucket with Objects.
Provision a Volume Group with Volume.
Create an SMB Share with Files.
Provision a new Storage Container.
Nutanix Volumes allows administrators to provision a volume group with one or more volumes that can be attached to multiple VMs or physical servers via iSCSI. This enables the creation of a Microsoft Server Failover Cluster that uses shared storage for a critical application.
Microsoft Server Failover Cluster typically uses shared block storage for its quorum disk and application data. Nutanix Volumes provides this via iSCSI by provisioning a Volume Group, which can be accessed by both the AHV-hosted VMs and bare metal servers. This setup ensures maximum resiliency, as the shared storage is accessible to all nodes in the cluster, allowing failover between VMs and bare metal servers as needed.
Exact Extract from Nutanix Documentation:
From the Nutanix Volumes Administration Guide (available on the Nutanix Portal):
“Nutanix Volumes provides block storage via iSCSI, which is ideal for Microsoft Server Failover Clusters requiring shared storage. To deploy an MSFC with VMs and bare metal servers, provision a Volume Group in Nutanix Volumes and expose it via iSCSI to all cluster nodes, ensuring shared access to the storage for high availability and failover.”
An administrator needs to protect a Files cluster unique policies for different shares.
How should the administrator meet this requirement?
Create a protection domain in the Data Protection view in Prism Element.
Configure data protection polices in File Server view in Prism Element
Create a protection domain in the Data Protection view in Prism Central.
Configure data protection polices in the Files view in Prism Central.
The administrator can meet this requirement by configuring data protection policies in the Files view in Prism Central. Data protection policies are policies that define how file data is protected by taking snapshots, replicating them to another site, or tiering them to cloud storage. Data protection policies can be configured for each share or export in a file server in the Files view in Prism Central. The administrator can create different data protection policies for different shares or exports based on their protection needs and requirements. References: Nutanix Files Administration Guide, page 79; Nutanix Files Solution Guide, page 9
Which confirmation is required for an Objects deployment?
Configure Domain Controllers on both Prism Element and Prism Central.
Configure VPC on both Prism Element and Prism Central.
Configure a dedicated storage container on Prism Element or Prism Cent
Configure NTP servers on both Prism Element and Prism Central.
The configuration that is required for an Objects deployment is to configure NTP servers on both Prism Element and Prism Central. NTP (Network Time Protocol) is a protocol that synchronizes the clocks of devices on a network with a reliable time source. NTP servers are devices that provide accurate time information to other devices on a network. Configuring NTP servers on both Prism Element and Prism Central is required for an Objects deployment, because it ensures that the time settings are consistent and accurate across the Nutanix cluster and the Objects cluster, which can prevent any synchronization issues or errors. References: Nutanix Objects User Guide, page 9; Nutanix Objects Deployment Guide
A team of developers are working on a new processing application and requires a solution where they can upload the … code for testing API calls. Older iterations should be retained as newer code is developer and tested.
Create an SMB Share with Files and enable Previous Version
Provision a Volume Group and connect via iSCSI with MPIO.
Create an NFS Share, mounted on a Linux Server with Files.
Create a bucket in Objects with Versioning enabled.
Nutanix Objects supports versioning, which is a feature that allows multiple versions of an object to be preserved in the same bucket. Versioning can be useful for developers who need to upload their code for testing API calls and retain older iterations as newer code is developed and tested. Versioning can also provide protection against accidental deletion or overwrite of objects. References: Nutanix Objects Administration Guide
The development team needs a solution to upload code via API calls while retaining older versions of the code as newer versions are developed. This use case aligns with versioned object storage, which supports API-based uploads (e.g., S3 APIs) and automatic versioning.
Analysis of Options:
Option A (Create a bucket in Objects with Versioning enabled): Correct. Nutanix Objects, part of Nutanix Unified Storage (NUS), provides S3-compatible object storage. It supports versioning, which allows multiple versions of an object to be retained when new versions are uploaded. The S3 API is ideal for programmatic uploads via API calls, meeting the developers’ requirement to upload code for testing while retaining older iterations.
Option B (Create an SMB Share with Files and enable Previous Versions): Incorrect. Nutanix Files supports SMB shares with the Previous Versions feature (via Self-Service Restore), which allows users to access earlier versions of files. However, SMB is not typically accessed via API calls—it’s designed for file sharing over a network (e.g., Windows clients). This does not align with the requirement for API-based uploads.
Option C (Provision a Volume Group and connect via iSCSI with MPIO): Incorrect. Nutanix Volumes provides block storage via iSCSI, which is suitable for applications requiring low-level storage access (e.g., databases). However, iSCSI does not support API-based uploads or versioning, making it unsuitable for the developers’ needs.
Option D (Create an NFS Share mounted on a Linux Server with Files): Incorrect. An NFS share in Nutanix Files allows file access over the NFS protocol, which can be mounted on a Linux server. While NFS supports file storage, it does not natively provide versioning, and NFS is not typically accessed via API calls for programmatic uploads.
Why Option A is the Best Solution:
Nutanix Objects with Versioning: Objects supports S3 APIs, which are widely used for programmatic uploads in development workflows. Enabling versioning ensures that older versions of the code are retained automatically when new versions are uploaded, meeting the requirement to retain older iterations.
API Support: The S3 API is a standard for API-based uploads, making it ideal for the developers’ workflow.
Scalability: Objects is designed for scalable object storage, suitable for development and testing environments.
Exact Extract from Nutanix Documentation:
From the Nutanix Objects Administration Guide (available on the Nutanix Portal):
“Nutanix Objects supports versioning for buckets, allowing multiple versions of an object to be retained. When versioning is enabled, uploading a new version of an object preserves the previous versions, which can be accessed or restored via S3 API calls. This feature is ideal for development workflows where older iterations of files need to be retained.”
An administrator is leveraging Smart DR to protect a Files share. There is a requirement that in the event of a failure, client redirection should be seamless. How should the administrator satisfy this requirement?
Create a reverse replication policy.
Enable redirection in the protection policy.
Update the AD and DNS entries.
Activate protected shares on the recovery site.
Smart DR in Nutanix Files, part of Nutanix Unified Storage (NUS), automates disaster recovery (DR) by replicating shares between primary and recovery file servers (e.g., using NearSync, as in Question 24). The administrator is using Smart DR to protect a Files share and needs seamless client redirection in the event of a failure, meaning clients should automatically connect to the recovery site without manual intervention.
Understanding the Requirement:
Smart DR Protection: Smart DR replicates the Files share from the primary site to the recovery site, typically with the primary site in read-write (RW) mode and the recovery site in read-only (RO) mode (as seen in the exhibit for Question 24).
Seamless Client Redirection: In a failure scenario (e.g., primary site down), clients should automatically redirect to the recovery site without needing to reconfigure their connections (e.g., changing the share path or IP address).
Files Share Context: Clients typically access Files shares via SMB or NFS, using a hostname or IP address (e.g., \fileserver\share for SMB or fileserver:/share for NFS).
Analysis of Options:
Option A (Create a reverse replication policy): Incorrect. A reverse replication policy would replicate data from the recovery site back to the primary site, typically used after failover to prepare for failback. This does not address seamless client redirection during a failure—it focuses on data replication direction, not client connectivity.
Option B (Enable redirection in the protection policy): Incorrect. Smart DR protection policies define replication settings (e.g., RPO, schedule), but there is no “redirection” setting in the policy itself. Client redirection in Nutanix Files DR scenarios is managed through external mechanisms like DNS, not within the protection policy.
Option C (Update the AD and DNS entries): Correct. Seamless client redirection in Nutanix Files DR scenarios requires that clients can automatically connect to the recovery site without changing their share paths. This is achieved by updating Active Directory (AD) and DNS entries:
DNS Update: The hostname of the file server (e.g., fileserver.company.com) should resolve to the IP address of the primary site’s File Server under normal conditions. During a failure, DNS is updated to point to the recovery site’s File Server IP address (e.g., the Client network IP of the recovery FSVMs). This ensures clients automatically connect to the recovery site without changing the share path (e.g., \fileserver.company.com\share continues to work).
AD Update: For SMB shares, the Service Principal Name (SPN) in AD must be updated to reflect the recovery site’s File Server, ensuring Kerberos authentication works seamlessly after failover.This approach ensures clients are redirected without manual intervention, meeting the “seamless” requirement.
Option D (Activate protected shares on the recovery site): Incorrect. Activating protected shares on the recovery site (e.g., making them RW during failover) is a necessary step for failover, but it does not ensure seamless client redirection. Without updating DNS/AD, clients will not know to connect to the recovery site—they will continue trying to access the primary site’s IP address, requiring manual reconfiguration (e.g., changing the share path), which is not seamless.
Why Option C?
Seamless client redirection in a Nutanix Files DR scenario requires that clients can connect to the recovery site without changing their share paths. Updating AD and DNS entries ensures that the file server’s hostname resolves to the recovery site’s IP address after failover, and AD authentication (e.g., Kerberos for SMB) continues to work. This allows clients to automatically redirect to the recovery site without manual intervention, fulfilling the requirement for seamlessness.
Exact Extract from Nutanix Documentation:
From the Nutanix Files Administration Guide (available on the Nutanix Portal):
“To ensure seamless client redirection during a Smart DR failover, update Active Directory (AD) and DNS entries. Configure DNS to resolve the file server’s hostname to the recovery site’s File Server IP address after failover, and update the Service Principal Name (SPN) in AD to ensure Kerberos authentication works for SMB clients. This allows clients to automatically connect to the recovery site without manual reconfiguration.”
Copyright © 2021-2026 CertsTopics. All Rights Reserved
